Showing posts with label WPF. Show all posts

Wednesday, June 16, 2021

Agriya

1. Can we use 'this' keyword inside static class?

2. What is Request Filter in Web api?

3. What is JWT token and how to validate it?

4. What is OWIN?

5. What is OAuth and how it is working?

6. What is Anchor property in Win Form?

7.  How to send values from one Form to another?

8. What  is Redux and how to use it?

9. Difference between static and Singleton?

10. Can we execute stored procedure inside function?

11. Which is multicast Observable?

 Ans Subject

12. Difference between Abstract and Interface. Which will you take when?

13. What is Request filter in Web API?

14. What is Filter Index?

15. What is execution plan in SQL Server?


Monday, February 25, 2019

Converter in WPF

A Value Converter functions as a bridge between a target and a source and it is necessary when a target is bound with one source, for instance you have a text box and a button control. You want to enable or disable the button control when the text of the text box is filled or null.

In this case you need to convert the string data to Boolean. This is possible using a Value Converter. To implement Value Converters, there is the requirement to inherit from IValueConverter in the System.Windows.Data namespace and implement the two methods Convert and ConvertBack.

Note: In WPF, Binding helps to flow the data between the two WPF objects. The bound object that emits the data is called the Source and the other (that accepts the data) is called the Target.

using System; 
using System.Collections.Generic; 
using System.Linq; 
using System.Text; 
using System.Threading.Tasks; 
using System.Windows.Data; 
 
namespace ValueConverters 
{ 
   public class ValueConverter:IValueConverter 
    { 
        public object Convert(object value, Type targetType, object parameter, System.Globalization.CultureInfo culture) 
        { 
            bool isenable = true; 
            if (string.IsNullOrEmpty(value.ToString())) 
            { 
               isenable = false; 
            } 
            return isenable; 
        } 
        public object ConvertBack(object value, Type targetType, object parameter, System.Globalization.CultureInfo culture) 
        { 
            throw new NotImplementedException(); 
        } 
    } 
} 

I have created a class named Value Converter that will convert the value from the source to the target. This class does the conversion of the WPF value by implementing IValueConverter. There are two methods in the Value Converter class that are implemented from the IValue Converter interface. The Convert method helps to do the conversion from the target to the source and ConvertBack converts from the Source to the Target.

Thursday, February 21, 2019

Interview

1. What are the types of databinding in WPF?
Ans : https://interview-preparation-for-you.blogspot.com/2019/02/types-of-data-binding-in-wpf.html

2. If we have two text boxes and and we set one text box IsNumeric property to true and other to false, How it works while Dependency properties are static.
3. What is converter in WPF?
Ans : https://interview-preparation-for-you.blogspot.com/2019/02/converter-in-wpf.html

4. How can we create converter in WPF?
Ans : https://interview-preparation-for-you.blogspot.com/2019/02/converter-in-wpf.html

5. If we have a readonly text box and a property name attached to its text porperty which mode need to set to reflect changes in textbox while change the property.
Ans OneWayToSource

6. If we have a table in which there is status field with value 0 and 1, we want to change 0 to 1 and 1 to 0.
UPDATE dbo.TestStudents 
SET Status =
( CASE 
WHEN (Status = 1) THEN 0
WHEN (Status = 0) THEN 1
END )

Types of Data Binding in WPF

Types of Binding

OneWay
TwoWay
OneWayToSource
OneTime


One Way

In this type of binding, data is bound to its source i.e. business model to its target i.e. UI. Whenever type anything in text box it assigned to its property.

Two Way

In this, data is getting updated from both sides i.e. source and target. If there is any change from UI, it updates the business model, and vice versa.


OneWayToSource

OneWayToSource is the reverse of OneWay binding; it updates the source property when the target property changes. It is good for read only text box whenever changes in variable it appear in textbox.

OneTime

This has the same behaviour as OneWay except it will only update the user interface one time. This should be your default choice for binding.

Sunday, December 23, 2018

Advantage of Routed Event?

The single routed event is listening for three buttons. If you try to write the same code using ordinary events, you'll have to use three separated events, one event by button.

This means that, instead of defining multiple events on every control in a same child, you have to define a routed event at the parent level, which will be raised by every concerned child.

A click occurs in a button and rises up to its StackPanel and then to the containing window where one code handles all clicks.
Routed events give us the flexibility to write our event handler code in the most conveniant place. 

Interview

1. If two view connected with one viewmodel and you want to update only one view while changed view model, how will you do that?
2. What are different layer in wpf architechture?
3. What are different type of container?
4. What is differnece between Static Resource and dynamic resource?
5. What is data context?
6. How will you update data base while adding new properties in model?
7. Difference between WPF and windows form in respect of display?
8. Is WPF replace Direct X?
9. Difference between Visual Tree and Logical Tree?
10. What is RelayCommand?
11. Difference between IEunumerable and IQueryable.


1.Difference Between angular 1 and angular 2
2. What is service in angular 2? And how to create it?

Thursday, November 29, 2018

WPF Rendering

The WPF graphics system uses device-independent units to enable resolution and device independence. Each device independent pixel automatically scales with the system's dots per inch(dpi) setting. UIElement.SnapsToDevicePixels provides WPF applications proper scaling for different dpi settings and makes the application automatically dpi-aware.

There are two system factors that determine the size of text and graphics on your screen: resolution and DPI. Resolution describes the number of pixels that appear on the screen. As the resolution gets higher, pixels get smaller, causing graphics and text to appear smaller. A graphic displayed on a monitor set to 1024 x 768 will appear much smaller when the resolution is changed to 1600 x 1200. 

The other system setting, DPI, describes the size of a screen inch in pixels. Most Windows systems have a DPI of 96, which means a screen inch is 96 pixels. Increasing the DPI setting makes the screen inch larger; decreasing the DPI makes the screen inch smaller. This means that a screen inch isn't the same size as a real-world inch; on most systems, it's probably not. As you increase the DPI, DPI-aware graphics and text become larger because you've increased the size of the screen inch. Increasing the DPI can make text easier to read, especially at high resolutions. 

Interview

1. How WPF render the controls?
2. If there are two buttons on a window form and you want to convert one button into textbox at click of second button, what will you do?
3. If there are two user controls, each controls have button on click of each button you want to togetger both button.
4. If there is a list of control names and you want to  create all controls. How will you do that?

5. Difference between sealed and Singleton.
Ans : There are two main difference
a. More than object can be created of sealed class
b. Singleton can be inherited by nested class while nested class can not inherit by nested  nor outer class.

6.What is explicit interface implementation?
Ans : In explicit interface implementation you have to define method with interface name.

Interface1.Add()
{

}

7. What are the benefit of routed event?

Saturday, November 17, 2018

IDataErrorInfo interfaceIN WPF

1. It is used to achieve validation in 

Wednesday, May 31, 2017

Attached Dependency Property

Attached dependency property as being the property equivalent of an extension method.
You basically attach a new property to an existing object. Without actually modifying the object definition.
 Which is especially handy when inheritance is not possible, like in sealed objects.

 The most important application, as far as I am concerned, is that you can make something bindable that is not
bindable out of the box. If some value(s) a GUI component can only be set by a method, you cannot use it from MVVM,
for example. By making an attached dependency property that passes on the new value to said method you work around that.
 See below for how you make such a callback.

So how do you make an attached dependency property?

You make a static class, in which the property is declared and 'hosted'


public static class DependencyPropertyHoster
{
  public static readonly DependencyProperty MyPropertyNameProperty =
    DependencyProperty.RegisterAttached("MyPropertyName", 
    typeof(TargetPropertyType), 
    typeof(DependencyPropertyHoster), 
    new PropertyMetadata(CallBackWhenPropertyIsChanged));

  // Called when Property is retrieved
  public static TargetPropertyType GetMyPropertyName(DependencyObject obj)
  {
    return obj.GetValue(MyPropertyNameProperty) as TargetPropertyType;
  }

  // Called when Property is set
  public static void SetMyPropertyName(
     DependencyObject obj, 
     TargetPropertyType value)
  {
    obj.SetValue(MyPropertyNameProperty, value);
  }

  // Called when property is changed
  private static void CallBackWhenPropertyIsChanged(
   object sender, 
   DependencyPropertyChangedEventArgs args)
  {
    var attachedObject = sender as ObjectTypeToWhichYouWantToAttach;
    if (attachedObject != null )
    {
      // do whatever is necessary, for example
      // attachedObject.CallSomeMethod( 
      // args.NewValue as TargetPropertyType);
    }
   }
}
This is roughly the equivalent of
public partial class ObjectTypeToWhichYouWantToAttach
{
  TargetPropertyType _myPropertyName;
  TargetPropertyType MyPropertyName
 {
   get
   {
     return _myPropertyName;
   }
   set
   {
     if( _myPropertyName != value )
     {
        //CallBackWhenPropertyIsChanged...
     }
   }
  }
}

The whole thing works by naming convention. So if you call your property "MyPropertyName", then:


  • Your DependecyProperty needs to be called MyPropertyNameProperty
  • Your Set method needs to be called SetMyPropertyName
  • Your Get method needs to be called GetMyPropertyName

When you register your property the way I do, the members in the RegisterAttached method call are, from left to right:

  • The name of your property (as a string, yes)
  • Property value type (here “TargetPropertyType”, but of course that can be anything)
  • Type of the hosting class (i.e. DependencyPropertyHoster in this case)
  • Callbackmethod to be called when the property is changed.

Tuesday, May 23, 2017

WPF interview Questions

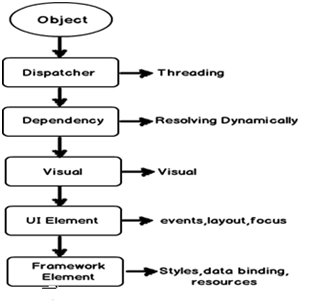
1. Can you explain the complete WPF object hierarchy?


Object: - As WPF is created using .NET so the first class from which WPF UI classes inherits is the .NET object class.
Dispatcher: - This class ensures that all WPF UI objects can be accessed directly only by the thread who own him. Other threads who do not own him have to go via the dispatcher object.
Dependency: - WPF UI elements are represented by using XAML which is XML format. At any given moment of time a WPF element is surrounded by other WPF elements and the surrounded elements can influence this element and this is possible because of this dependency class. For example if a textbox surrounded by a panel, its very much possible that the panel background color can be inherited by the textbox.
Visual: - This is the class which helps WPF UI to have their visual representation.
UI Element: - This class helps to implement features like events, input, layouting etc.
Framework element: - This class supports for templating , styles , binding , resources etc.
And finally all WPF controls textbox , button , grids and whatever you can think about from the WPF tool box inherits from the framework element class.

Does that mean WPF has replaced DirectX?

No, WPF does not replace DirectX. DirectX will still be still needed to make cutting edge games. The video performance of directX is still many times higher than WPF API. So when it comes to game development the preference will be always DirectX and not WPF. WPF is not an optimum solution to make games, oh yes you can make a TIC TAC TOE game but not high action animation games.
One point to remember WPF is a replacement for windows form and not directX.

So is XAML meant only for WPF ?

No,XAML is not meant only for WPF.XAML is a XML-based language and it had various variants.
WPF XAML is used to describe WPF content, such as WPF objects, controls and documents. In WPF XAML we also have XPS XAML which defines an XML representation of electronic documents.
Silverlight XAML is a subset of WPF XAML meant for Silverlight applications. Silverlight is a cross-platform browser plug-in which helps us to create rich web content with 2-dimensional graphics, animation, and audio and video.
WWF XAML helps us to describe Windows Workflow Foundation content. WWF engine then uses this XAML and invokes workflow accordingly.

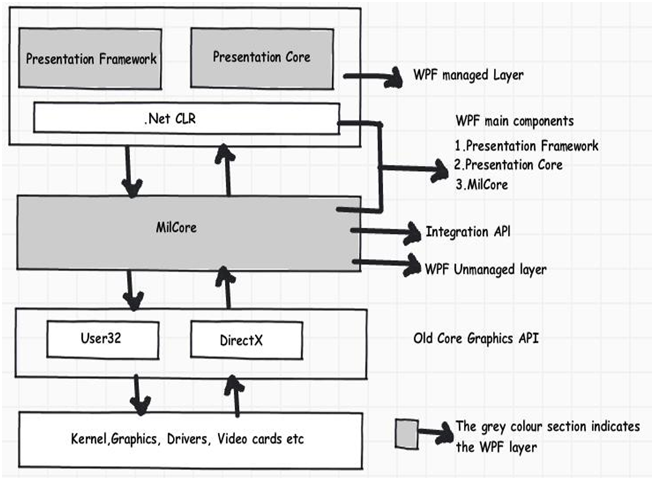
Can you explain the overall architecture of WPF?


What is the need of WPF when we had windows forms?

CodeRemember: - ABCDEFG
A - Anywhere execution ( Windows or  browser application)
B - Bindings ( less coding)
C - Common look and feel ( resource and styles) -- one style can be bind to all text box
D - Declarative programming (XAML)
E - Expression blend animation ( Animation ease)
F - Fast execution ( Hardware acceleration)
G - Graphic hardware independent ( resolution independent)

Explain the difference between static and dynamicresource?

static resource declared in xaml while dynamic resource can be set from code behind.

When should we use static resource over dynamic resource ?

Dynamic resources reduce application performance because they are evaluated every time the resource is needed. So the best practice is use Static resource until there is a specific reason to use dynamic resource. If you want resource to be evaluated again and again then only use dynamic resource.

What are the benefits of MVVM?

Separation of concern: -
Increased UI Reusability: 
Automated UI Unit testing: 


Thursday, May 18, 2017

Layout in WPF

There are five types of layout. All layout controls have a common base class named panel.

1. Stack Panel
2. Wrap Panel
3. Canvas
4. Dock Panel
5. Grid

Stack Panel -  

Stack panel shows the elements in the form of stack. Orientation can be change Horizontal or Vertical.

Wrap Panel-

Wrap panel wrap the control according to available space.

Canvas -

On canvas, you can put the element on a particular position by setting top and left property.

Dock Panel- 

This is similar to the functionality of dock property of windows form. Multiple controls can be placed with different dock like top,bottom, left, right or full.

Grid -

We can place the control in grid in the form of row and column.


Wednesday, February 1, 2017

Triggers in WPF


What is Trigger ?


Trigger defines a list of setters that are executed on specific condition. Triggers are used in style tag or Template Control.
Why do use Trigger?

By using Triggers we can change the appearance of Framework Elements.


How many types of triggers are in WPF?


There are five types of triggers supported by WPF; they are:


Property Trigger


Data Trigger


MultiTrigger


MultiDataTrigger


Event Trigger

Property Triggers executes, when a property gets a specified value.
MultiTrigger executes, when multi property changed.
MultiDataTrrigger MultiTrigger and MultiDataTrigger are the same, except they allow you to specify multiple conditions (properties or bindings respectively) and take effect only when all conditions are satisfied.
Event Triggers executes, when a specified event is fired.
Data Triggers executes, when a binding expression reaches a specified value.


Property trigger used with dependency properties, data trigger used with normal properties and event trigger used for animation.


Property Trigger Example -

 <TextBlock Text="Hello, styled world!" FontSize="28" HorizontalAlignment="Center" VerticalAlignment="Center">
            <TextBlock.Style>
                <Style TargetType="TextBlock">
                    <Setter Property="Foreground" Value="Blue"></Setter>
                    <Style.Triggers>
                        <Trigger Property="IsMouseOver" Value="True">
                            <Setter Property="Foreground" Value="Red" />
                            <Setter Property="TextDecorations" Value="Underline" />
                        </Trigger>
                    </Style.Triggers>
                </Style>
            </TextBlock.Style>
        </TextBlock>


It says that if mouse over on specific control than control color will be red.

Event Trigger Example

<TextBlock Name="lblStyled" Text="Hello, styled world!" FontSize="18" HorizontalAlignment="Center" VerticalAlignment="Center">
            <TextBlock.Style>
                <Style TargetType="TextBlock">
                    <Style.Triggers>
                        <EventTrigger RoutedEvent="MouseEnter">
                            <EventTrigger.Actions>
                                <BeginStoryboard>
                                    <Storyboard>
                                        <DoubleAnimation Duration="0:0:0.300" Storyboard.TargetProperty="FontSize" To="28" />
                                    </Storyboard>
                                </BeginStoryboard>
                            </EventTrigger.Actions>
                        </EventTrigger>
                        <EventTrigger RoutedEvent="MouseLeave">
                            <EventTrigger.Actions>
                                <BeginStoryboard>
                                    <Storyboard>
                                        <DoubleAnimation Duration="0:0:0.800" Storyboard.TargetProperty="FontSize" To="18" />
                                    </Storyboard>
                                </BeginStoryboard>
                            </EventTrigger.Actions>
                        </EventTrigger>
                    </Style.Triggers>
                </Style>
            </TextBlock.Style>

        </TextBlock>

 I use an EventTrigger to subscribe to two events: MouseEnter and MouseLeave. When the mouse enters, I make a smooth and animated transition to a FontSize of 28 pixels in 300 milliseconds. When the mouse leaves, I change the FontSize back to 18 pixels but I do it a bit slower, just because it looks kind of cool.

MultiTrigger Example


MultiDataTrigger Example


Data Trigger Example

<CheckBox Name="cbSample" Content="Hello, world?" />
        <TextBlock HorizontalAlignment="Center" Margin="0,20,0,0" FontSize="48">
            <TextBlock.Style>
                <Style TargetType="TextBlock">
                    <Setter Property="Text" Value="No" />
                    <Setter Property="Foreground" Value="Red" />
                    <Style.Triggers>
                        <DataTrigger Binding="{Binding ElementName=cbSample, Path=IsChecked}" Value="True">
                            <Setter Property="Text" Value="Yes!" />
                            <Setter Property="Foreground" Value="Green" />
                        </DataTrigger>
                    </Style.Triggers>
                </Style>
            </TextBlock.Style>
        </TextBlock>


we have a CheckBox and a TextBlock. Using a DataTrigger, we bind the TextBlock to theIsChecked property of the CheckBox. We then supply a default style, where the text is "No" and the foreground color is red, and then, using a DataTrigger, we supply a style for when the IsChecked property of the CheckBox is changed to True, in which case we make it green with a text saying "Yes!"

Thursday, January 19, 2017

Difference Between List and Observable Collection

1. Observable collection has automatically update the UI in case of adding and removing items. While List does not update the UI while we use list as binding.

2. Observable Collection implements INotifyCollectionChanged and INotifyPropertyChanged interface. So in case of using Observable Collection no need to use INotifyCollectionChanged and INotifyPropertyChanged interface explicitly.

https://www.youtube.com/watch?v=YW3gq-zyzoE&feature=em-subs_digest

Wednesday, January 11, 2017

How to stop routed event?

We have following xaml
 x:Class = "WPFRoutedEvents.MainWindow" 
   xmlns = "http://schemas.microsoft.com/winfx/2006/xaml/presentation" 
   xmlns:x = "http://schemas.microsoft.com/winfx/2006/xaml" 
   Title = "MainWindow" Height = "450" Width = "604" ButtonBase.Click  = "Window_Click" >
 
    
       Margin = "20" ButtonBase.Click = "StackPanel_Click">             


If you want to stop the routed event at any particular level, then you will need to set the e.Handled = true;
Let’s change the StackPanel_Click event as shown below −
private void StackPanel_Click(object sender, RoutedEventArgs e)
{
 txt2.Text = "Click event is bubbled to Stack Panel"; 
e.Handled = true; 
}


Before Stopping the output will be

Button is Clicked
Click event is bubbled to Stack Panel
Click event is bubbled to Window

After Stopping the output

Button is Clicked
Click event is bubbled to Stack Panel


Thursday, November 3, 2016

Dependencies properties


WPF vastly uses dependency properties internally. For example button’s background property is backed by a dependency property called BackgroundProperty.

Dependency property’s name always ends with property.

Dependency properties are always declared as static and read-only because it should be available to all the controls hence it should be shared and therefore it should always static.

It should be read-only because it’s value should not be changed after initialization.
Data binding can be done with dependency properties only.

Dependency properties are special properties which provide change notification.


Why We Need Dependency Properties


Dependency property gives you all kinds of benefits when you use it in your application. Dependency Property can used over a CLR property in the following scenarios −
If you want to set the style
If you want data binding
If you want to set with a resource (a static or a dynamic resource)
If you want to support animation

Basically, Dependency Properties offer a lot of functionalities that you won’t get by using a CLR property.

The main difference between dependency properties and other CLR properties are listed below −


CLR properties can directly read/write from the private member of a class by using getter and setter. In contrast, dependency properties are not stored in local object.


Dependency properties are stored in a dictionary of key/value pairs which is provided by the DependencyObject class. It also saves a lot of memory because it stores the property when changed. It can be bound in XAML as well.

Routed Event

A routed event is special type of event which can invoke handlers on multiple listeners in an element tree rather than just the object that raised the event.

Routed have three main routing strategies

1.       Direct Event
2.       Bubbling Event
3.       Tunneling Event
Direct event is normal CLR event.
Bubbling event travels up in visual tree hierarchy.
Tunneling event travels down in visual tree hierarchy.


The difference between a bubbling and a tunneling event is that a tunneling event will always start with a preview. Ex.. previewkeydown, previewkeyup. We can create our routed event.

Wednesday, October 12, 2016

ICommand and Command

1. Command are loosely typed events.
2. ICommand interface is used to implement command in MVVM
3. ICommand interface exist in System.Window.Input
4. ICommand interface contains two methods Execute, Canexecute and one event handler CanExecuteChanged.

To bind a command of a button you need to bind a property of type  ICommand. An ICommand contains
  1. event EventHandler CanExecuteChanged;    
  2. bool CanExecute(object parameter);    
  3. void Execute(object parameter);    
CanExecuteChanged is invoked when changes occur that can change whether or not the command can be executed.

CanExecute will determine whether the command can be executed or not. If it returns false the button will be disabled on the interface.

Execute runs the command logic.

With a simple implementation of ICommand I can create the following:
  1. public class NormalCommand : ICommand    
  2. {    
  3.     public event EventHandler CanExecuteChanged;    
  4.      
  5.     public bool CanExecute(object parameter)    
  6.     {    
  7.           
  8.     }    
  9.      
  10.     public void Execute(object parameter)    
  11.     {    
  12.          
  13.     }    
  14. }   
However this does not allow me to have a different logic to my CanExecute or Execute. For each command I would need to implement a new class. To solve that problem there is the RelayCommandimplementation that is a command that can be instantiated passing the actions to be executed as in the following:
  1. public class RelayCommand : ICommand    
  2. {    
  3.     private Action<object> execute;    
  4.     private Func<object, bool> canExecute;    
  5.      
  6.     public event EventHandler CanExecuteChanged    
  7.     {    
  8.         add { CommandManager.RequerySuggested += value; }    
  9.         remove { CommandManager.RequerySuggested -= value; }    
  10.     }    
  11.      
  12.     public RelayCommand(Action<object> execute, Func<object, bool> canExecute = null)    
  13.     {    
  14.         this.execute = execute;    
  15.         this.canExecute = canExecute;    
  16.     }    
  17.      
  18.     public bool CanExecute(object parameter)    
  19.     {    
  20.         return this.canExecute == null || this.canExecute(parameter);    
  21.     }    
  22.      
  23.     public void Execute(object parameter)    
  24.     {    
  25.         this.execute(parameter);    
  26.     }    
  27. }  
With this implementation I can specify what I want to execute when I create the command, so I don't need to implement a new class for each different action I want to take. Then it could be called using the following:
  1. var cmd1 = new RelayCommand(o => { /* do something 1 */ }, o => true);    
  2. var cmd2 = new RelayCommand(o => { /* do something 2 */ }, o => true);   
The CommandManager.RequerySuggested handles events when something in the interface suggests that a requery should happen. If your ICommand adds the handlers to it then it will automatically update UI elements when the screen executes some actions. (For example, lose focus on a TextBox.)

Tuesday, June 14, 2016

Difference Between WPF User Control and Custom Control

User Control: When you need to put some controls together than you use user control. Example is RGB color panel. It is same as window because it has code behind file as well xaml file.
It does not support theming for consumers.It is better to stay with consumer application.

Custom Control: When you wan to extent the funtionality of a given control than use Custom Control Like Numeric Drop down is an extended custom control , Which is build by customizing text box.
It support theming for consumers. It is perfect to be 3rd party conrol.

Friday, March 25, 2016

What is Windows Workflow Foundation?

.Net 3.0 introduced Window Work Flow Foundation. The main theme of WWF is separation of Business Process code and implementation.
A workflow model can be prepared in pure .Net, pure XAML, or mix of both.  A workflow model can be implemented in Windows, ASP.Net or Window Services. So workflow defined what is done and how it is done defined in traditional programming language.
Namespace System.Workflow contains all the necessary modules to develop Window Workflow.
Main characteristic of Workflow are:
1.       Visual Representation of Process.
2.       Easily modifiable at runtime
3.       It may be a long running process
Window workflows has two types.
1.       Sequential workflows : used for well-defined workflow, process workflow

2.       State Machine workflows: it is useful in a workflow where human interaction is required.

Followers

Link